
User Guide
Everything you need to know about ZupFlash — from first launch to advanced agent tools.
Getting Started
Download & Install
Download the latest ZupFlash installer from the home page. Run the installer — it takes about 30 seconds. No administrator privileges required.
First Launch
On first launch you'll see the main ZupFlash window. To use cloud providers, head to Settings → API Keys and enter your key for any supported provider. For local models (Ollama, LM Studio, or custom providers), no API key is needed — just make sure the server is running.
Setting a Default Model
In Settings → Default Model, choose your preferred provider and model. This will be pre-selected whenever you start a new conversation.
System Tray
ZupFlash lives in your system tray. Right-click the tray icon to quickly open the main window or quit the app. It stays running in the background so the overlay hotkey is always available.
The Overlay
The overlay is ZupFlash's signature feature — a floating AI input that appears on top of any application.
Activation
Press Alt + Space (default) anywhere on your desktop. The overlay appears centered on screen, ready for your query. Press Escape to dismiss it.

Typing a Query
Type your question and press Enter to send. Long queries wrap automatically and the input grows to fit. Press Shift + Enter to insert a newline without sending. The response streams in real-time below the input. You can press the Stop button to halt generation at any point.
Model Selector
Click the provider/model pill at the right side of the input to switch models on the fly. The dropdown auto-scrolls to your currently selected model.
If the selected provider requires an API key and none is configured, the input is disabled and a warning banner appears. The model selector stays active so you can switch to a provider that has a key, or to a local model that doesn't need one.
Toolbar Actions
After receiving a response, the toolbar provides:
- Copy — copies the response to your clipboard
- Expand — opens the full conversation in the main window
- Clear — clears the current conversation
Drag & Resize
Drag the handle bar at the top to move the overlay anywhere on screen. Grab the left or right edges to resize it between 500px and 900px wide. You can also set a default width in Settings → Overlay.
Pin Overlay
By default, clicking outside the overlay dismisses it. Enable Pin overlay in Settings to keep it visible when you interact with other windows.
Token Counter
The bottom-right corner of the overlay shows your cumulative token usage for the current conversation. Hover to see the input/output breakdown.
Main Window: Chat
The Chat page is your full-featured conversation interface, accessible from the sidebar's first icon.
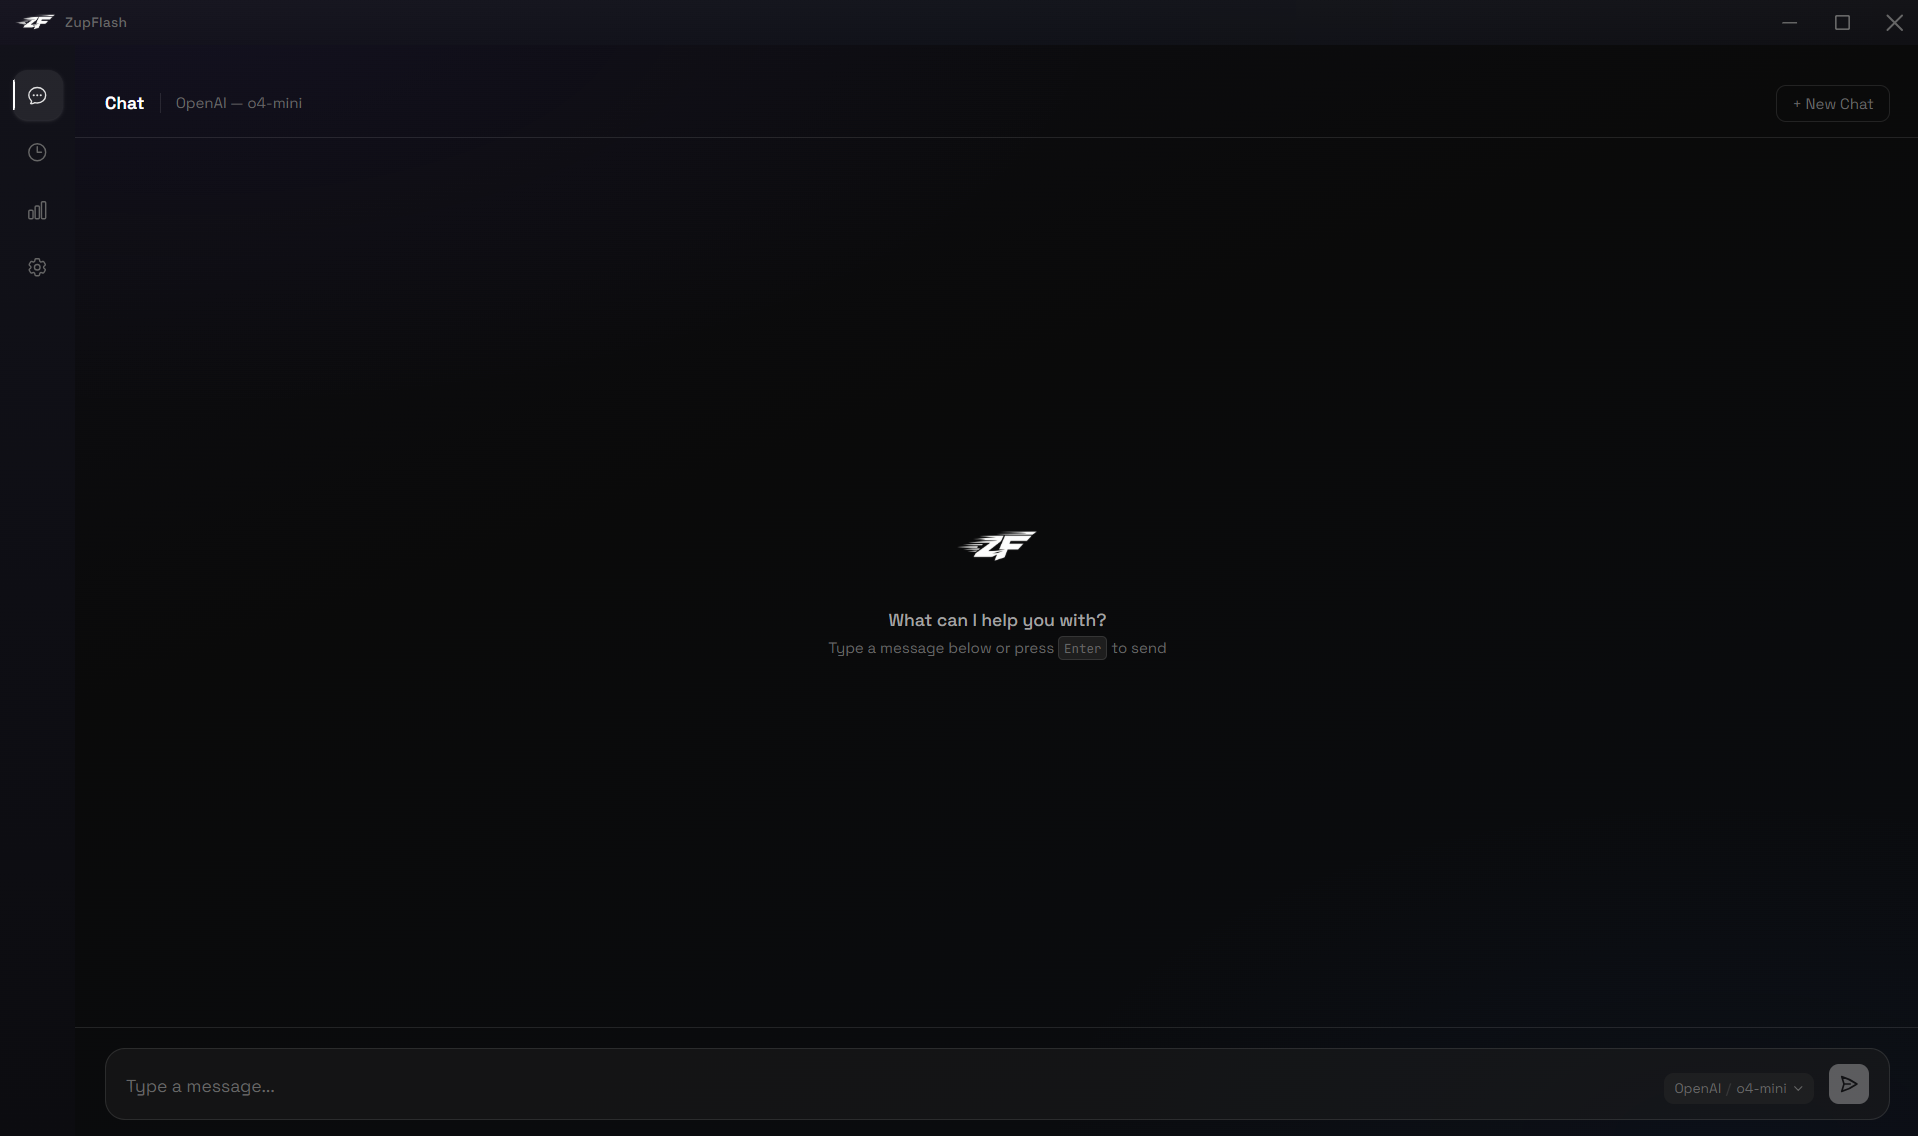
Conversation Title
When you start a new chat, the header displays "Chat" along with your provider and model. After sending your first message, the header switches to an auto-generated title (first 50 characters of your message). Click the title to rename it — press Enter to save or Escape to cancel.
Model Selector
The inline model pill in the input bar lets you switch provider/model mid-conversation. The dropdown auto-scrolls to the currently active model.
Markdown & Code
Responses render full Markdown: headings, lists, tables, bold, links, and more. Code blocks get syntax highlighting with a one-click copy button.
New Chat
Click + New Chat in the top-right corner to start a fresh conversation. The previous conversation is automatically saved to history.
Token Counter
The bottom of the chat window shows cumulative token usage for the active conversation. It updates in real-time, including when tokens are consumed via the overlay for the same conversation.
Zoom
Adjust the interface size with keyboard shortcuts:
- Ctrl + = — zoom in
- Ctrl + - — zoom out
- Ctrl + 0 — reset to 100%
Zoom is clamped between 50% and 150% and persists across sessions.
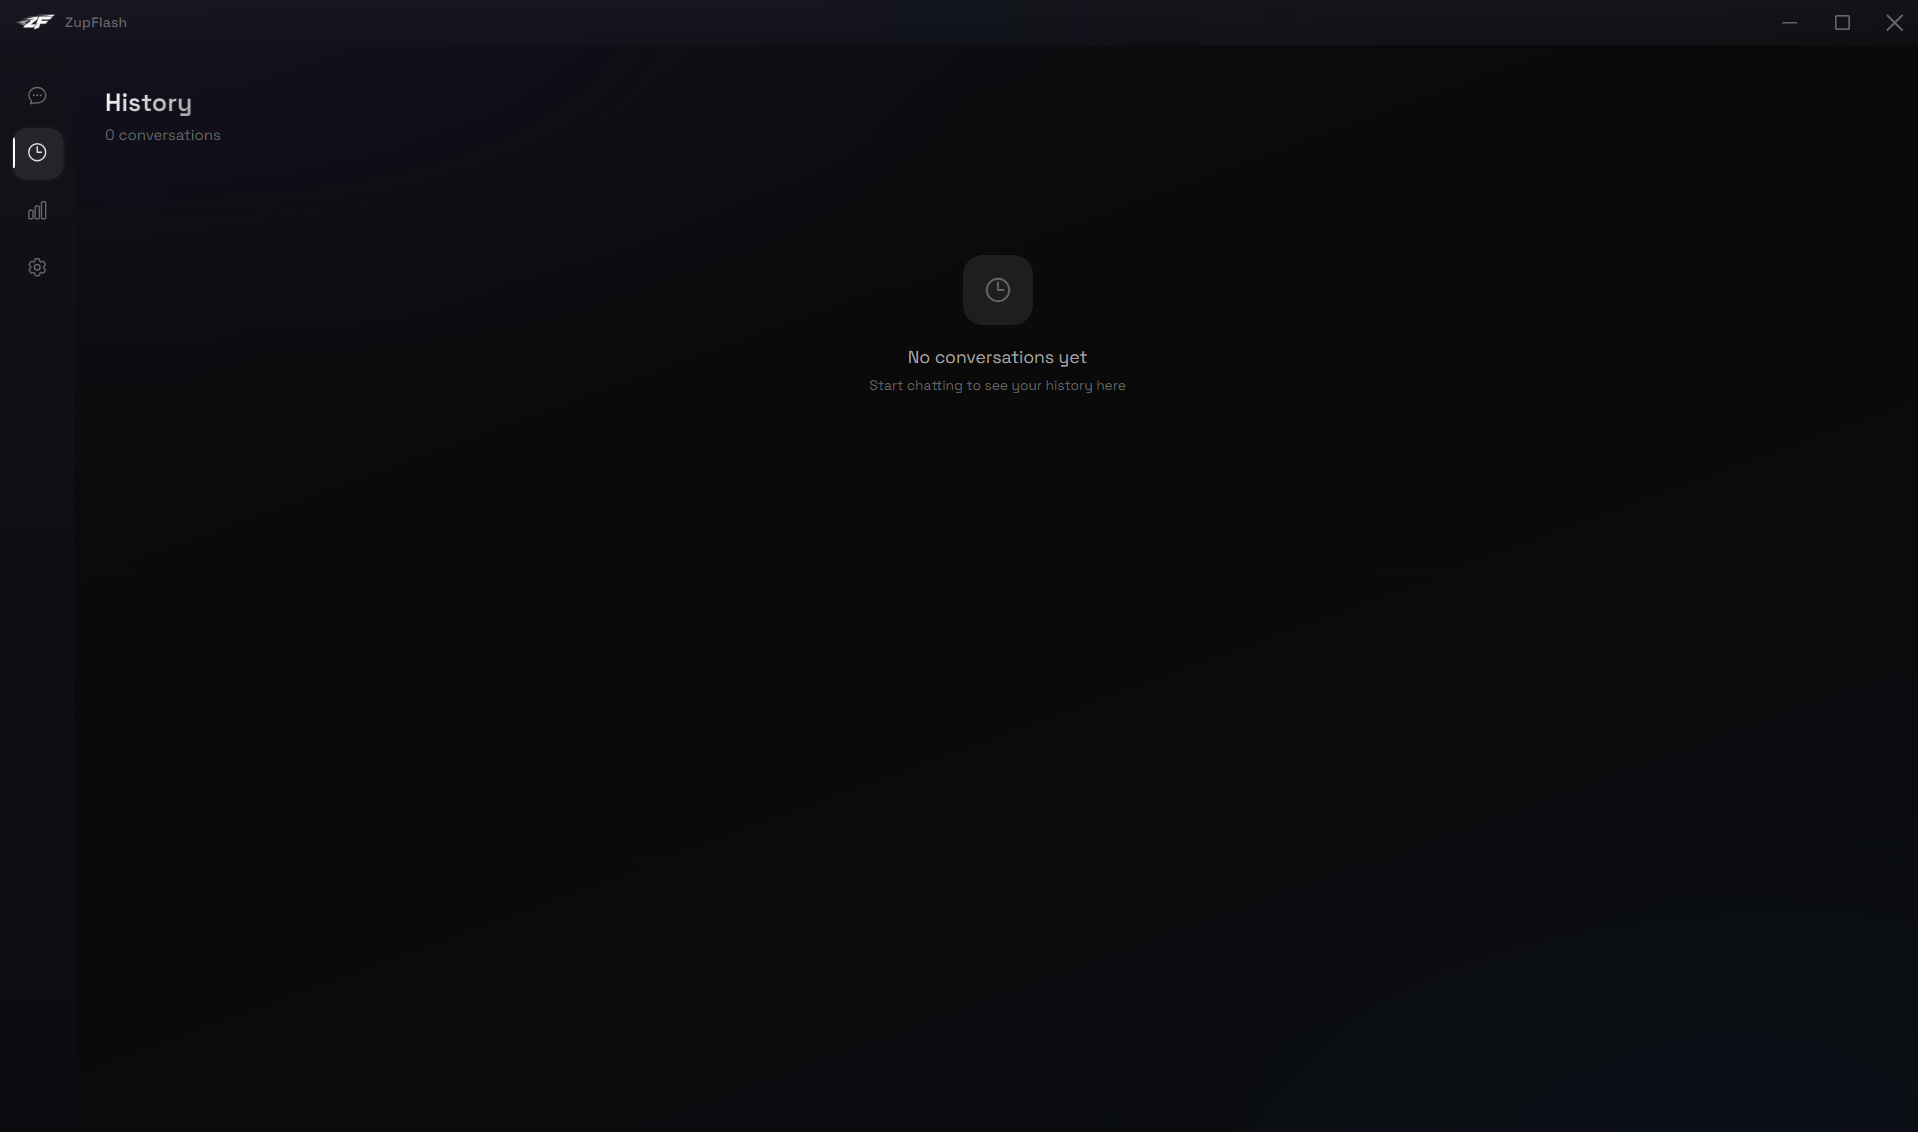
Main Window: History
The History page (clock icon in the sidebar) shows all your saved conversations in a grouped list, organised by date — Today, Yesterday, This Week, This Month, and Older.
Search
Use the search bar at the top of the list to filter conversations by title, provider, or model name. The counter updates to show how many results match.
Opening a Conversation
Click any conversation row to reopen it in the Chat page. All messages, token counts, and the conversation title are restored.
Deleting Conversations
Hover over a row to reveal the delete icon on the right, or select multiple conversations using the checkboxes that appear on hover and delete them in bulk with the Delete N button. You can also Clear All to permanently remove all history.
Row Details
Each row shows the conversation title, provider badge, model name, and timestamp. Recent groups display the time of day while older groups show the date.
Main Window: Usage
The Usage page (bar chart icon in the sidebar) is your token analytics dashboard.
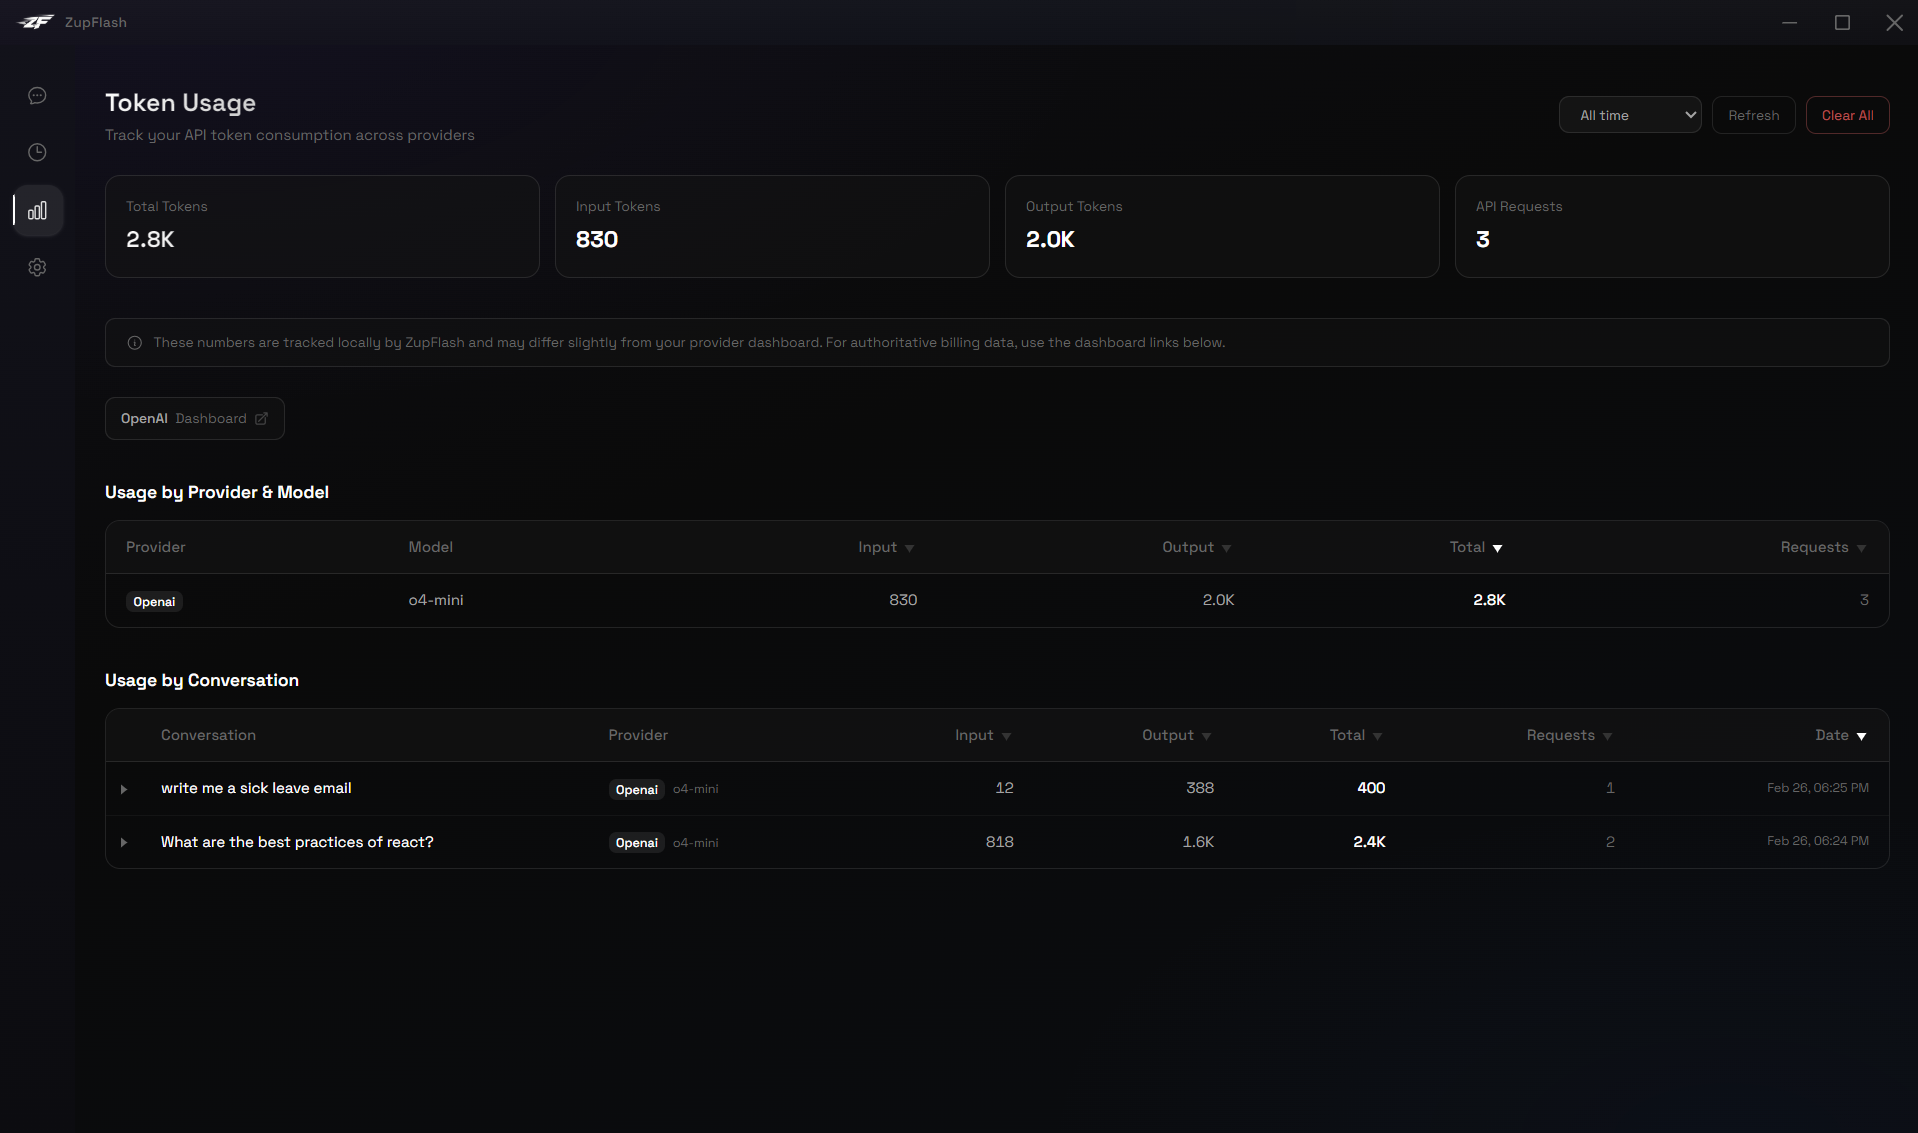
Summary Cards
Four cards at the top show total tokens, input tokens, output tokens, and API request count for the selected time range.
Date Filters
Use the dropdown to filter usage by Last 7 days, Last 30 days, or All time.
Usage by Provider & Model
A sortable table showing token consumption per provider/model combination. Click any column header to sort. Use the search box to filter by name.
Usage by Conversation
A second table showing per-conversation usage. Click the arrow to expand a row and see individual API calls. All numeric columns are sortable.
Provider Dashboard Links
Quick-access buttons link to the official usage dashboards of each provider you've used (OpenAI, Anthropic, Google, Grok, Mistral) for authoritative billing data.
Clear Usage Data
The Clear All button permanently deletes all locally stored token usage records.
Settings
The Settings page (gear icon in the sidebar) uses a left sidebar navigation with six categories. Click any category to view its settings full-width on the right.
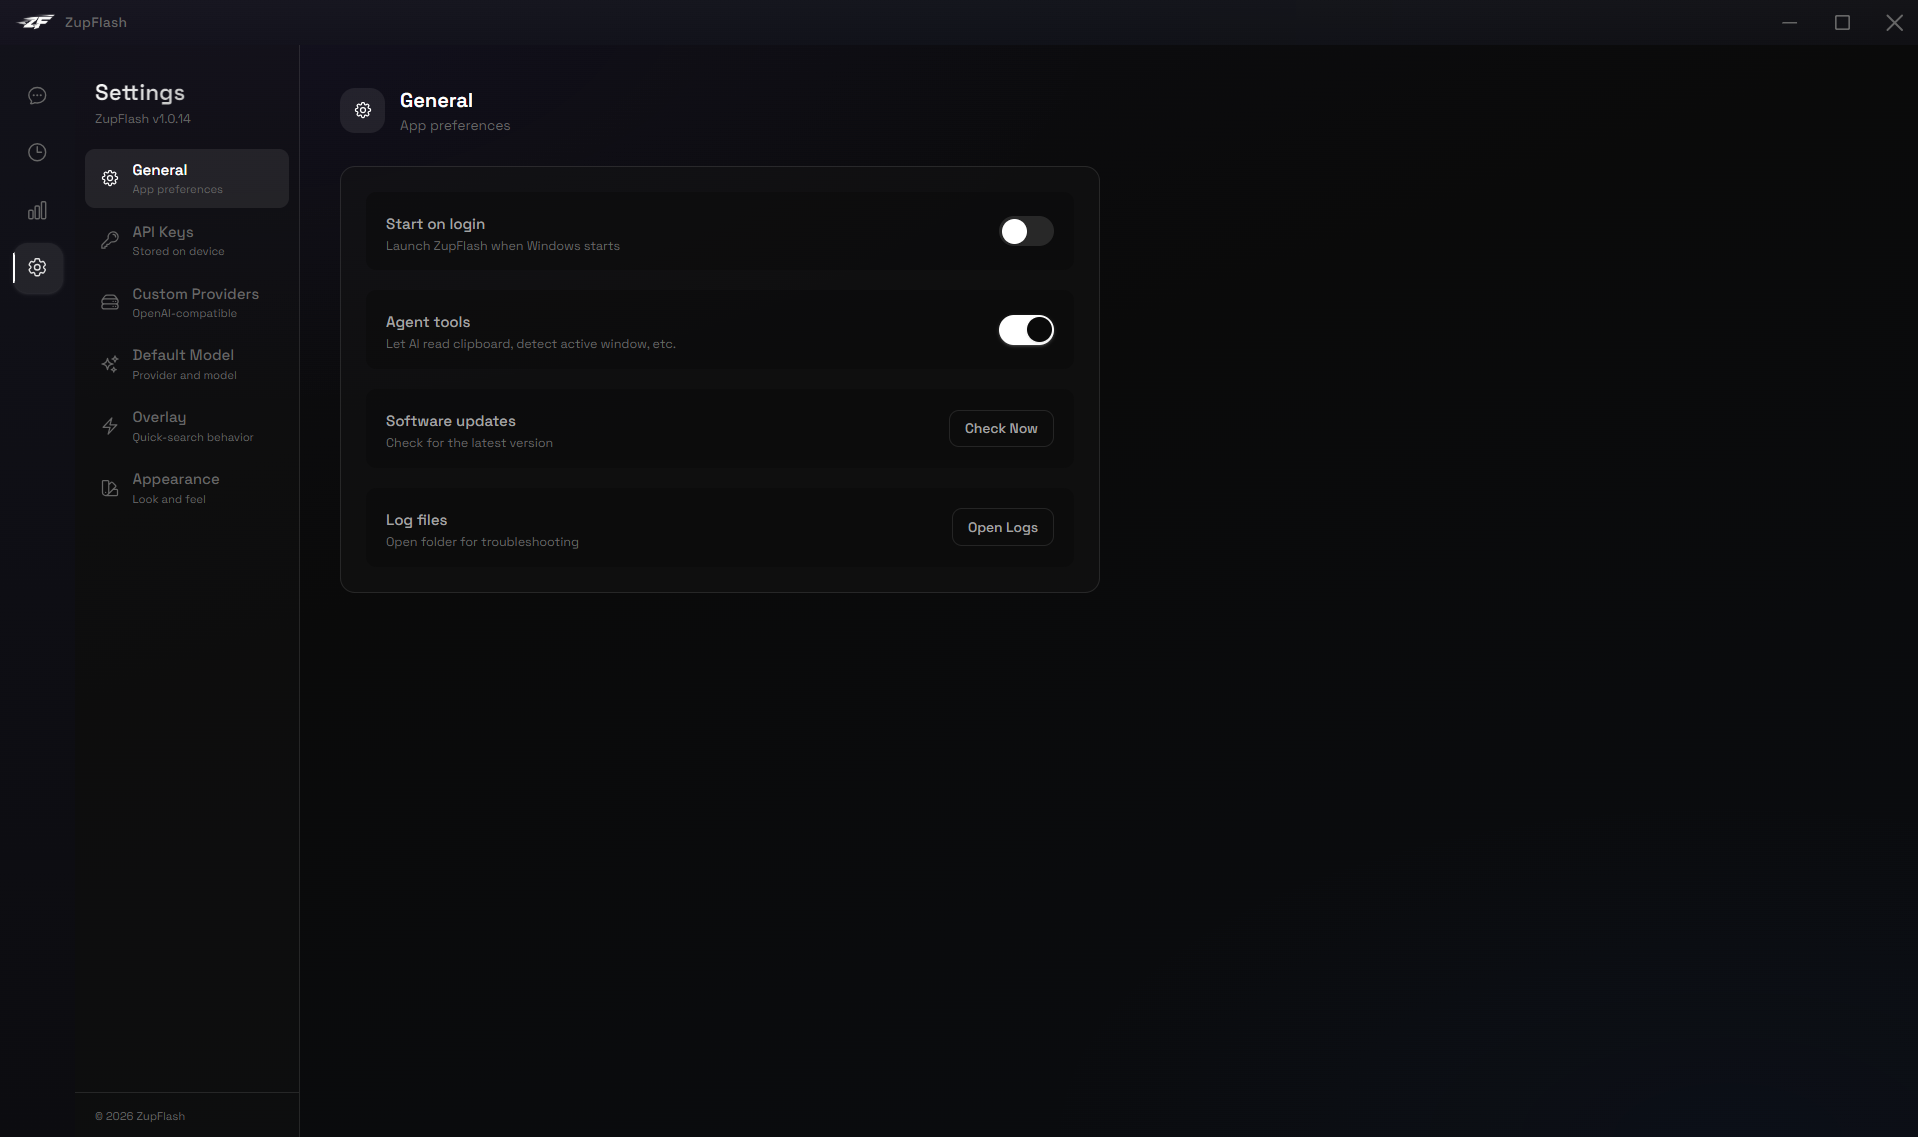
General
- Start on login — Launch ZupFlash automatically when Windows starts.
- Enable agent tools — Toggle whether the AI can use system tools (clipboard, active window, etc.). See the Agent Tools section.
- Download log files — Opens the logs folder for troubleshooting.
Default Model
- Provider — Select your default AI provider.
- Model — Choose the model to use by default for new conversations.
- System prompt — Set a custom system prompt that gets sent with every request.
Overlay
- Activation hotkey — Record a new hotkey or type it manually (e.g. Alt+Space). Changes apply immediately.
- Clear chat on Escape — When enabled, pressing Escape not only closes the overlay but also clears the conversation.
- Pin overlay — Keep the overlay visible when clicking outside it.
- Overlay width — Slider from 500px to 900px with live preview.
Appearance
- App theme — System, Light, Dark, or Glass (transparent acrylic blur).
- Overlay theme — Dark, Light, or Glass, independent of the app theme.
- Glass mode — Uses the Windows Acrylic material for a frosted-glass translucent effect. Best on Windows 11; also works on Windows 10.
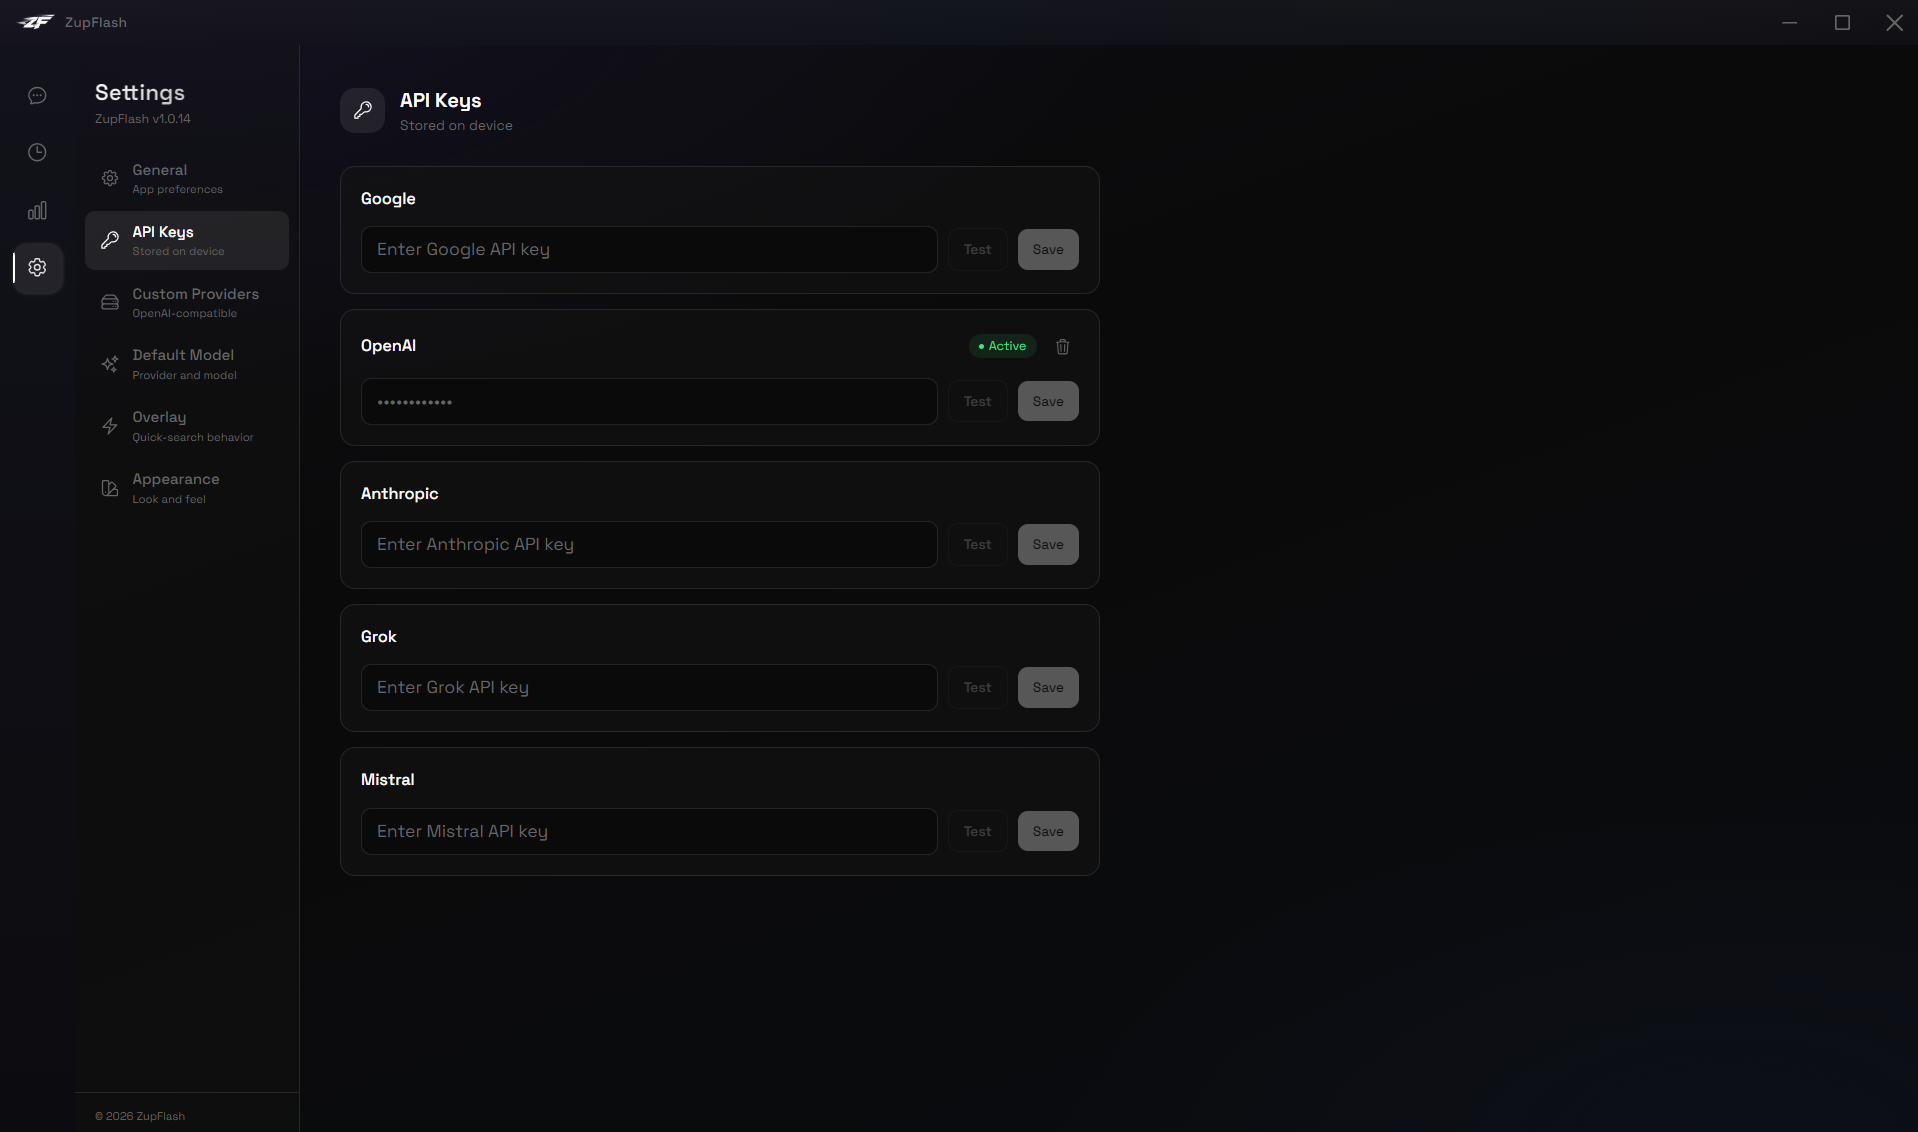
API Keys
Add, test, and manage API keys for each provider. Keys are encrypted with AES-256-GCM and stored locally.
- Test before save — Validates the key by making a test API call before storing it.
- Status badges — Active, Connected, or Failed indicators for each key.
- Delete key — Remove a stored API key permanently.

Custom Providers
Add your own OpenAI-compatible endpoints. See the Custom Providers section below for full details.
Agent Tools
When Enable agent tools is turned on in Settings → General, ZupFlash gains the ability to interact with your system on your behalf.
How It Works
ZupFlash uses a custom agent loop: every message is sent to the AI model along with all available tool definitions. The model decides whether to call a tool or just respond with text. When it requests a tool call, ZupFlash executes it locally and returns the result. This loop continues until the model produces a final answer.
Available Tools
Read Clipboard
Reads the current text on your system clipboard. Triggered by questions about copied content, e.g. "Explain what I just copied."
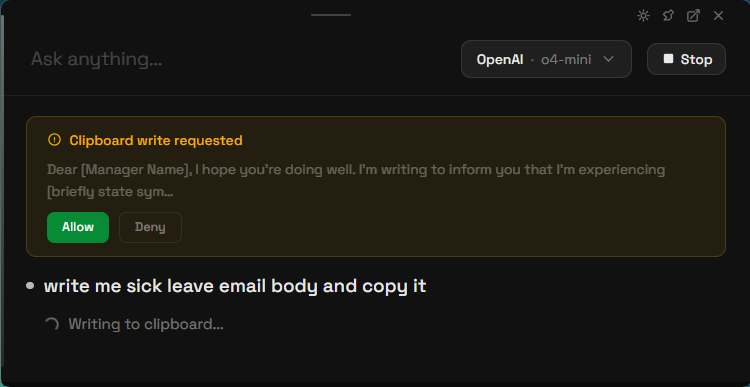
Write Clipboard
Copies text to your clipboard. This tool requires your explicit consent — a dialog will appear showing a preview of what will be copied. Click Allow or Deny.
Paste to Window
Pastes text directly into any application window. By default it targets the window behind ZupFlash, but you can specify a target — e.g. "paste this into Notepad" or "put it in VS Code." If the target window is minimized, ZupFlash restores it automatically. Requires your consent — a dialog shows the character count and target before pasting.
Open App
Launches any installed Windows application by name — e.g. "open notepad", "launch Teams", "open Spotify." Works with built-in apps and any third-party app installed on your system by searching Start Menu shortcuts. Requires your consent before launching. Combine with Paste to Window: "open notepad and paste my clipboard."
Save File
Saves AI-generated content to a file on your computer. Say "write a Python script and save it to my desktop" or "save this as config.json in my documents." Supports Desktop, Documents, and Downloads as shortcuts, or any full path. Requires your consent — a dialog shows the filename, size, and destination before writing.
Capture Screenshot
Captures your primary monitor and sends it to the AI vision model for analysis. Say "what's on my screen?", "read this error message", or "help me with this UI." ZupFlash windows are automatically hidden during capture. The image is resized and compressed before sending to keep token usage low. Requires your consent before capturing.
Read File
Reads the contents of a text file from your computer. Say "read config.json on my desktop", "check C:\Projects\main.py", or "what's in my downloads/report.csv?" Supports Desktop, Documents, and Downloads as shortcuts, or any full path. Works with all common text formats (.txt, .py, .js, .json, .csv, .md, .html, etc.). Large files are truncated to ~100 KB. Requires your consent before reading.
Active Window
Detects the title and process name of the window you were using before opening ZupFlash. Try: "Which app am I using?"
System Info
Returns your operating system, CPU architecture, current date and time, and timezone.
Tool Step Indicators
When the agent uses a tool, you'll see a status indicator in the chat (e.g. "Reading clipboard...", "Done"). These appear in both the overlay and main chat window.
Consent Flow
Tools that modify your system ( Write Clipboard, Paste to Window, Open App, Save File, Read File, and Capture Screenshot) will ask for your permission before executing. The consent dialog shows a context-aware preview — character count for paste, app name for open, filename and destination for save, and a confirmation for screenshots — so you always know exactly what's about to happen.
If you prefer a faster workflow, enable Auto-approve actions in Settings → General. This skips consent dialogs entirely — the AI will execute tool actions immediately. You'll still see tool step indicators showing what was done.
Providers
ZupFlash supports multiple AI providers. You can use cloud providers with API keys, or run local models with no internet required.
Cloud Providers
| Provider | Models |
|---|---|
| Gemini 3.x, 2.5, 2.0 series | |
| OpenAI | GPT-5.2, GPT-4.1, o3/o4-mini, GPT-4o |
| Anthropic | Claude Opus 4, Sonnet 4, Haiku |
| Grok | Grok 4.1, 3 series |
| Mistral | Mistral Large, Medium, Small |
Local Models
ZupFlash supports two local model runners. No API key needed — just make sure the runner is active on your machine.
- Ollama — Connects to the local Ollama server. Add your downloaded model names in Settings.
- LM Studio — Connects to LM Studio's local API. Configure your model identifiers in Settings.
Adding an API Key
- Go to Settings → API Keys.
- Select the provider from the list.
- Paste your API key into the input field.
- Click Test & Save. ZupFlash will verify the key works before storing it.
- A green "Connected" badge confirms the key is active.
Custom Providers
Beyond the built-in providers, ZupFlash lets you connect to any OpenAI-compatible API endpoint — whether it's running on your local machine or on your network.
Why Custom Providers?
- Run Ollama or LM Studio on a non-default port
- Use other local servers like vLLM, llama.cpp, LocalAI, or text-generation-webui
- Connect to a model hosted on another machine on your LAN
- Use any OpenAI-compatible cloud API not listed as a built-in provider
Adding a Custom Provider
- Go to Settings and scroll to the Custom Providers section (right column, below API Keys).
- Enter a Display name (e.g. "My vLLM Server").
- Enter the Base URL — the root URL of the OpenAI-compatible API, including
/v1if the server expects it (e.g.http://localhost:8080/v1). - Toggle Requires API key if the server needs authentication.
- Click Add Provider.
Testing Connectivity
Each custom provider has a Test button that pings the server's /models endpoint. You'll see a Connected or Failed badge with a descriptive error message if something goes wrong.
Using a Custom Provider
Once added, your custom provider appears in the Default Model dropdown under a "Custom" group — and in the overlay's model selector. ZupFlash automatically detects available models from the server and shows them in a dropdown. If the server is unreachable, you can still type a model name manually. Click Refresh to re-fetch the model list at any time.
Common Base URLs
| Server | Default Base URL |
|---|---|
| Ollama (custom port) | http://localhost:<port>/v1 |
| LM Studio (custom port) | http://localhost:<port>/v1 |
| llama.cpp server | http://localhost:8080/v1 |
| vLLM | http://localhost:8000/v1 |
| LocalAI | http://localhost:8080/v1 |
| text-generation-webui | http://localhost:5000/v1 |
Limitations
- Custom providers use the OpenAI-compatible chat completions format. Servers that don't implement
/v1/chat/completionswon't work. - Agent tools (clipboard, system info, etc.) are disabled for custom providers, as most local models don't support function calling.